As a variation on the Mandelbrot fractal that I’ve computed before using NumPy array operations, I’d like to show you a few Julia fractals with some color added.
I’ll concentrate on the Julia sets that are generated using the same quadratic polynomial that is used to generate the Mandelbrot set, which is \(f_c(z)=z^2+c\). To compute the Mandelbrot set, you set \(c\) to the coordinate of the current point, and then start iterating with \(z=0\). I.e., you compute \(f_c^n(0)\), and if \(f_c^n(0)\) does not “escape to infinity” for \(n\to\infty\), the point \(c\) is in the set. To compute a Julia set, you do basically the same thing, but instead of starting with \(z\) put to zero and \(c\) put to the coordinate of the current point, you start with \(z\) put to the coordinate of the current point and with \(c\) a constant. This means that you’ll get a different Julia set for each value of \(c\), where there is only a single Mandelbrot set.
In order to compute this polynomial for all pixels of an image at the same time, we create a matrix \({\bf Z}\), and then do the computation
\[{\bf Z}^{(t+1)}={\bf Z}^{(t)}*\,{\bf Z}^{(t)}+\,c\,{\bf J},\]
where \(*\) means element-wise matrix multiplication. \(c\) is a (complex) constant, and \({\bf J}\) is the unit matrix with the same dimensions as \({\bf Z}\). A unit matrix is a matrix with all elements equal to \(1\).
The Basic Computation
Each element of the matrix \({\bf Z}\) must be initialized to the coordinate of the pixel in the complex plane that it represents, as explained in Computing the Mandelbrot Set using NumPy Array Operations for the matrix \({\bf C}\).
In Python, this can be done as follows.
from __future__ import division

import numpy as np

m = 480
n = 320

s = 300  # Scale.
x = np.linspace(-m / s, m / s, num=m).reshape((1, m))
y = np.linspace(-n / s, n / s, num=n).reshape((n, 1))
Z = np.tile(x, (n, 1)) + 1j * np.tile(y, (1, m))
As for the Mandelbrot set, the computation itself can be done by a short Python fragment:
C = np.full((n, m), -0.4 + 0.6j)
M = np.full((n, m), True, dtype=bool)
for i in range(256):
    Z[M] = Z[M] * Z[M] + C[M]
    M[np.abs(Z) > 2] = False
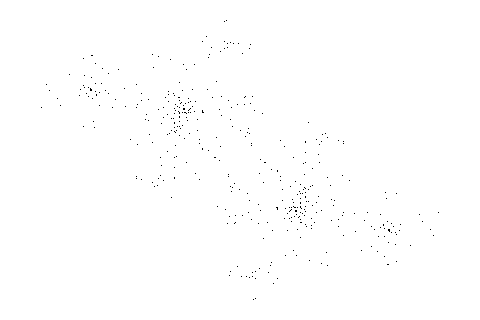
The example code is hard-coded for \(c=-0.4+0.6i\). However, the result of doing this computation is a bit underwhelming, as shown in Figure 1.
 Figure 1. Julia set for c=−0.4+0.6i.
Adding Color
The reason for this is that this particular set does not have a solid main body such as the Mandelbrot set. However, we can show the structure of the set better by coloring each pixel according to the number of iterations that it needs to “escape to infinity”, and plot that instead. Still using array operations, only a small code change is needed:
C = np.full((n, m), -0.4 + 0.6j)
M = np.full((n, m), True, dtype=bool)
N = np.zeros((n, m))
for i in range(256):
    Z[M] = Z[M] * Z[M] + C[M]
    M[np.abs(Z) > 2] = False
    N[M] = i
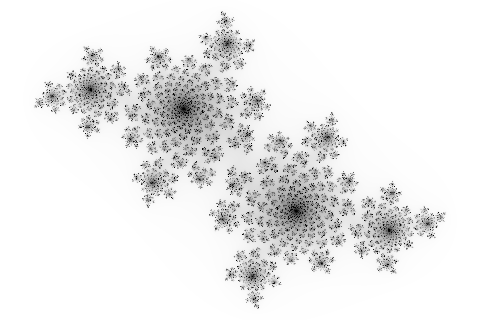
The matrix N is initialized with zeros. After each iteration, the points that remain in M are updated with the iteration number. Figure 2 shows that the result is already much more convincing.
 Figure 2. Julia set for c=−0.4+0.6i, pixels are darker if they escape later.
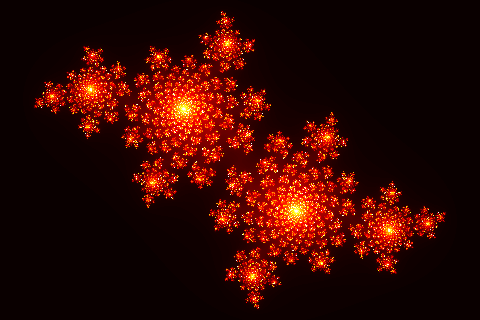
Of course, now that we’re on a roll, we’ll go all the way and use a palette that makes the image “pop”, instead of a simple gray level. There are several ways to do this, but I’ve picked imshow() from Matplotlib. There are quite some special settings to get rid of the axes and stuff, but the following fragment does the trick.
fig = plt.figure()
fig.set_size_inches(m / 100, n / 100)
ax = fig.add_axes([0, 0, 1, 1], frameon=False, aspect=1)
ax.set_xticks([])
ax.set_yticks([])
plt.imshow(np.flipud(N), cmap='hot')
 Figure 3. Julia set for c=−0.4+0.6i, with "hot" colormap.
Python Code
Here’s the complete Python program:
from __future__ import division

import numpy as np
from scipy import misc
import matplotlib.pyplot as plt

m = 480
n = 320

s = 300  # Scale.
x = np.linspace(-m / s, m / s, num=m).reshape((1, m))
y = np.linspace(-n / s, n / s, num=n).reshape((n, 1))
Z = np.tile(x, (n, 1)) + 1j * np.tile(y, (1, m))

C = np.full((n, m), -0.4 + 0.6j)
M = np.full((n, m), True, dtype=bool)
N = np.zeros((n, m))
for i in range(256):
    Z[M] = Z[M] * Z[M] + C[M]
    M[np.abs(Z) > 2] = False
    N[M] = i

misc.imsave('julia-m.png', np.flipud(1 - M))
misc.imsave('julia.png', np.flipud(255 - N))

# Save with Matplotlib using a colormap.
fig = plt.figure()
fig.set_size_inches(m / 100, n / 100)
ax = fig.add_axes([0, 0, 1, 1], frameon=False, aspect=1)
ax.set_xticks([])
ax.set_yticks([])
plt.imshow(np.flipud(N), cmap='hot')
plt.savefig('julia-plt.png')
plt.close()
To show that a small change in the value of \(c\) can make a big difference, Figure 4 shows the Julia set for \(c=-0.42+0.6i\) instead of \(-0.4+0.6i\).
 Figure 4. Julia set for c=−0.42+0.6i, with "hot" colormap.
Add new comment